

Cheap and Easy Trail Food: Build a Backpacking Meal Plan Without Spending a Fortune
When I first started planning my Colorado Trail section hikes, I didn’t realize just how quickly pre-packaged backpacking food could become a big expense. And it seemed that every gear list I looked at included a stack of freeze-dried meals. Mountain House, Peak Refuel, Backpacker’s Pantry…the kind of meals where you just add hot water and eat straight from the pouch.
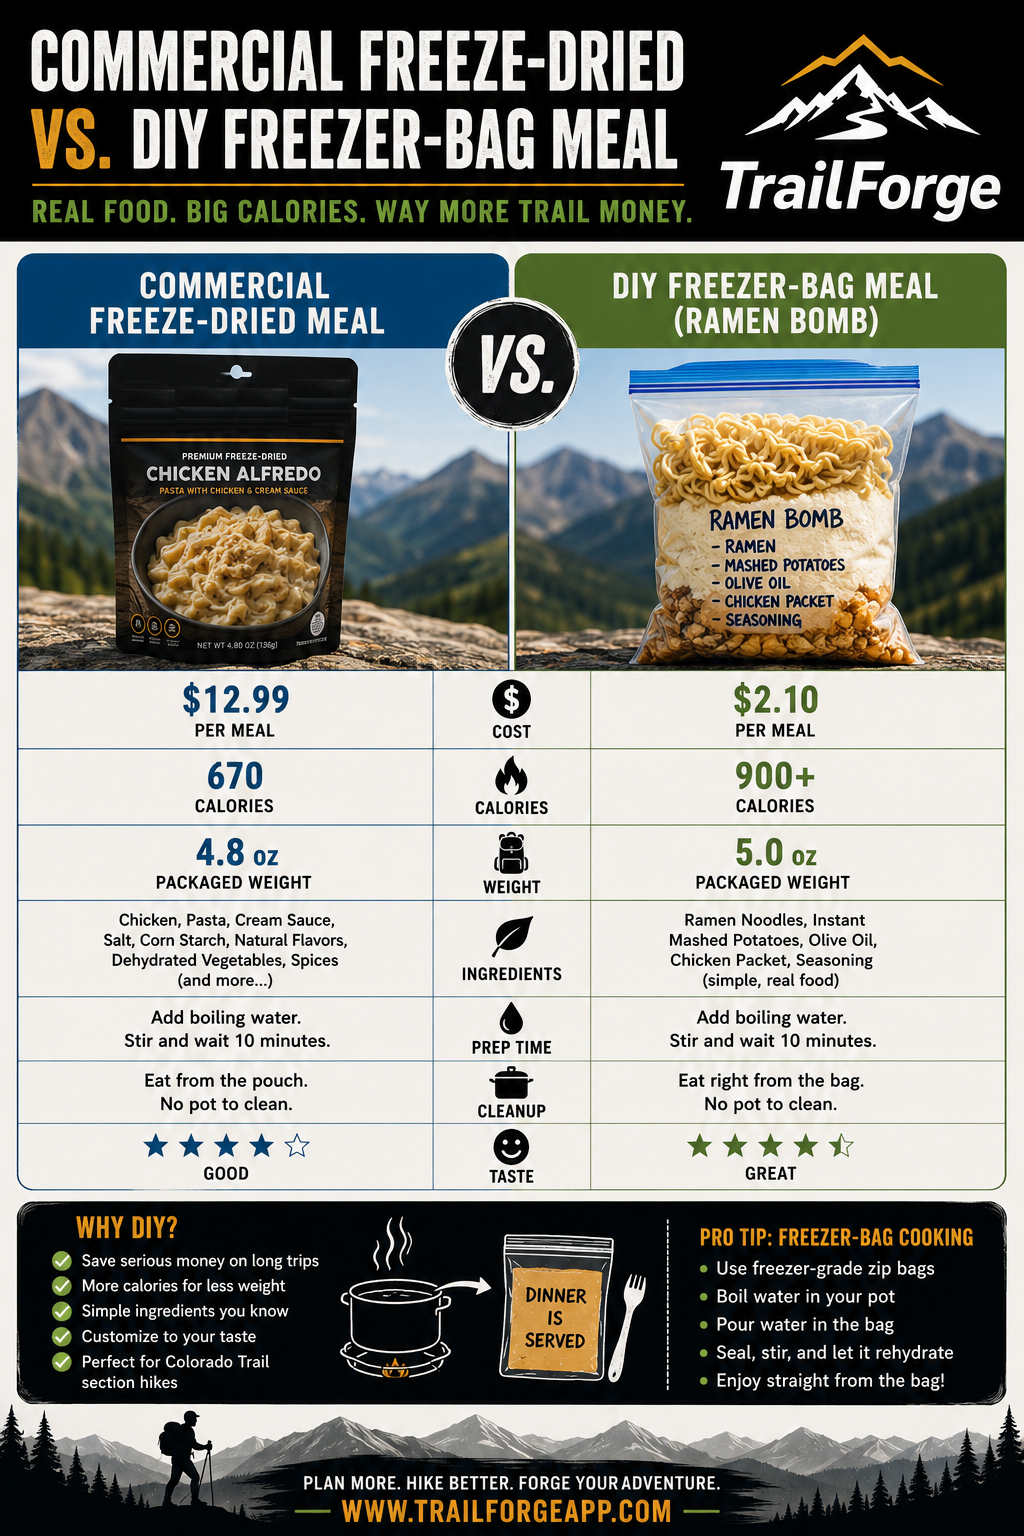
There’s nothing wrong with those meals. They’re convenient, lightweight, and many of them taste surprisingly good. The problem is the cost. If you’re paying $10–15 per dinner and you’re out for a week, or a month, food expenses can add up fast. But as I dug deeper into backpacking food, I discovered something interesting:
Many experienced backpackers don’t rely heavily on commercial backpacking meals at all.

Instead, they use simple grocery-store foods, DIY meal mixes, and a technique called freezer-bag cooking to build inexpensive, high-calorie meals that work just as well on the trail.
Here are a few things I’ve learned while putting together my own Colorado Trail meal plan.
You Probably Don’t Need Traditional Meals
One of the big surprises for me in researching my Colorado Trail trip was realizing that many backpackers don’t really eat breakfast, lunch, and dinner out on the trail the way they do at home. Instead, the day often looks like this:
- Quick breakfast at camp
- Continuous snacking throughout the day while hiking
- Larger meal at camp in the evening
When you’re hiking all day, stopping for a full lunch isn’t always necessary. It’s often easier to keep moving and eat small amounts throughout the day as you go. For a Colorado Trail section hike, especially if you’re targeting 15-18 mile days, food strategy becomes less about meal timing and more about maintaining a steady flow of calories.
Cheap Breakfasts That Require Almost No Work
Breakfast is one of the easiest places to save money. In fact, many backpackers skip cooking entirely in the morning, other than maybe heating up some water for coffee. With options like cold-soaking overnight, or just adding water to your homemade cereal mix, there’s really no need for cooking breakfast.
One of my favorite option so far is overnight oats. Before bed, combine:
- Quick oats
- Powdered milk
- Chia seeds
- Raisins or dried cranberries
- Walnuts or pecans
- A little vanilla protein powder (optional)
Add water, let it sit overnight, and breakfast is ready when you wake up. It’s inexpensive, calorie-dense, and requires no fuel in the morning. Another simple option is granola mixed with powdered milk, dried fruit, and nuts.
Neither option feels particularly exciting at home, but when you’re packing up camp at 6:30 in the morning, simple starts looking pretty good.
Trail Food Is Really Your Lunch
Out on the trail most of your daytime calories will come from snacks. Rather than carrying ingredients for a traditional lunch, many backpackers rely on foods that can be eaten while walking. Some common options include:
|
|
|
A peanut butter tortilla might not sound impressive, but it’s lightweight, cheap, and surprisingly calorie dense. The same goes for trail mix. A large bag containing peanuts, raisins, pretzels, and M&Ms can easily provide more than a thousand calories and costs far less than specialty backpacking food.
What Is Freezer-Bag Cooking?
One of the most interesting backpacking food techniques I’ve come across is freezer-bag cooking. The basic idea is simple. Instead of cooking food in your pot, you place your meal ingredients inside a freezer-grade zip-top bag. Boil water in your stove pot, pour it into the bag, seal it, and let the food rehydrate. A few minutes later, dinner is ready, and you don’t even have to clean your pot afterward. The pot only ever touches water.
Wait…you can put boiling water in a ziplock bag?
Yep. I didn’t believe it either until I did some research on it, and it turns out that you can safely pour boiling water into freezer zip-top bags. That’s an important distinction to know, you must use freezer bags and NOT standard sandwich bags because freezer bags are thicker and hold up much better to hot water. Just be sure to use name-brand freezer bags (Ziploc Freezer, Hefty Freezer) and not the cheap Walmart knock-offs.
Freezer bags are designed to handle temperature swings (freezer → room temp → warm contents) and are much thicker, so they don’t soften or deform when hot water is added. But, you still have to be careful and make sure you don’t put the bag directly on a stove or in a pot! The bag is fine with boiling water, but it is not fine with direct heat.
The correct method for this would be:
- Boil water in your pot
- Remove pot from heat
- Pour water into freezer bag
- Seal bag
- Let it rehydrate
Many backpackers also place the bag inside their cook pot or an insulated sleeve while the meal rehydrates to help retain heat.
But what about chemicals or microplastics?
This comes up a lot, and was a question I had as well. Freezer bags are BPA-free, and your water is poured in after boiling (not heated in the plastic), which means your exposure time is short (5–15 minutes).
If you’re still concerned, you can:
- Pour water in after letting it cool ~30 seconds
- Use silicone reusable bags
- Use a rigid container like a Talenti jar instead of a freezer bag
It’s also important to note that you do NOT use freezer bags when you are frying or simmering, or with any direct flame contact or alcohol stove setups where flame is uncontrolled.
Building Your Own Backpacking Meals
This is where the real savings happen. Instead of buying commercial freeze-dried meals, you can combine inexpensive grocery-store ingredients into meals that provide just as many calories. Here are few examples of DIY backpacking meals I will be trying out on the Colorado Trail.
Loaded Mashed Potatoes
Combine:
- Instant mashed potatoes
- Bacon bits
- Cheese powder
- Butter powder
Add boiling water and stir. Simple, filling, and surprisingly satisfying after a long day
The Famous Ramen Bomb
Combine:
- One package of ramen
- Instant mashed potatoes
- Olive oil packet
- Chicken packet
The result is a high-calorie meal that costs only a few dollars.
Mac & Cheese Deluxe
Combine:
- Instant mac and cheese
- Tuna packet
- Powdered milk
Taco Rice Bowl
Combine:
- Instant rice
- Refried bean flakes
- Taco seasoning
- Cheese powder
Add boiling water and let it sit.
Thanksgiving Bowl
Combine:
- Instant stuffing
- Instant potatoes
- Chicken packet
- Gravy mix
This sounds strange until you try it.
Chicken Rice Bowl
- Knorr rice side
- Chicken packet
- Olive oil
Approx: 900-1,000 calories!
The Secret Ingredient: Olive Oil
One thing I’ve noticed while researching backpacking food is how often experienced hikers talk about olive oil. There’s a good reason. One ounce contains roughly 240 calories. That’s an incredible calorie-to-weight ratio. Adding one or two olive oil packets to dinner is one of the easiest ways to increase calorie intake without adding much weight or bulk. When you’re hiking in Colorado’s high country all day, those extra calories can make a noticeable difference.
Final Thoughts
One of the biggest lessons I’ve learned while planning Colorado Trail section hikes is that backpacking doesn’t have to be expensive. It’s easy to look at gear lists and assume every piece of equipment and every meal has to be a specialized backpacking product. But in reality, many hikers are eating grocery-store food, repackaging ingredients at home, and creating simple meals that cost a fraction of commercial freeze-dried options.
For me, freezer-bag cooking and cold-soaking feels like the sweet spot. It keeps meals simple, reduces cleanup, saves money, and still provides the calories needed for long days on the trail. And honestly, after hiking fifteen miles through the Colorado mountains, a bag of mashed potatoes and bacon bits sounds pretty good.
Ready to Start Planning Your Colorado Trail Adventure?
If you’re like me and trying to figure out how to fit the Colorado Trail into a busy schedule, I’ve put together a free Colorado Trail Section Hiker Planning Guide for you to use. It covers trail sections, planning strategies, and practical tips that can help turn a someday dream into an actual plan. Download your free guide below and start building your own Colorado Trail adventure today.
Start planning your Colorado Trail adventure today!
Download the free Colorado Trail Section Hiker Planning Guide and learn how to break the trail into manageable sections, avoid common mistakes, and build a realistic multi-year plan.
Discover more from TrailForge Blog
Subscribe to get the latest posts sent to your email.


